Showing posts with label Software Guide. Show all posts

Unistall or Reinstall Windows Media Player in Windows 7

Sometimes Windows innate program are often troubled or do not function normally. This can make our computer performance is not optimal. These tips might you need if an innate program like Windows Media Player were damaged or not functioning as usual. The best overcome to that problem is reinstall. However, many do not know the steps. Here is the steps to reinstall the program Windows Media Player in Windows 7.
  1. Click Start menu and then Run. Type "appwiz.cpl" (without the quotes) and press Enter for opening Programs and Features window.
  2. In Programs and Features window, click "Turn Windows Features on or off" it's on the left side of the window.
  3. Featured Windows window will appear. Expand node "Media Features". Then remove the check mark or grass on the Windows Media Player option and click OK.
  4. A dialog will appear stating that the disable windows media player then you also will disable Windows Media Center. Click OK in the dialog.
  5. Next, a window that asks if you want to restart with your computer. Click the restart button to complete the uninstall process windows media player.
Restart process and deleting Windows Media Player program need longer time than the usually required by computer when restart. When the restart process is completed, Windows Media Player will disappear from your computer. Already completed the steps to uninstall (remove) Windows Media Player from your computer.

If you want reinstall Windows Media Player, you give check mark in steps number 3 and following the instructions. I hope the tips for unistall or reinstall Windows Media Player in windows 7 useful for us. If you have questions about unistall or reinstall Windows Media Player in windows 7, send via comment form.

how to restore files or folders are hidden by the virus

My computer when infected by virus and that makes me more confused is the virus hides important files or folders. So, when I want to do a backup before reinstall, file or folder I found difficult. I try some antivirus programs like Avira personal, Kaspersky, AVG and more, I thing the virus has entered into memory, the virus can not be resolved and my files or folders that hidden by can not be found.

Apparently, I know the viruses that infect my computer is a local virus, so I use local antivirus. Thankfully, the virus could be exterminated, so I do not need to reinstall my computer. But strangely, the important files and folders still do not visible. After nearly half a day, find out about this incident, finally I met with an article about how to restore files or folders are hidden by the virus. This is because some viruses are giving hidden attributes and system in files or folders that infected.

After I knew the cause, and I was able to restore files or folders that hidden by the virus, so I share the tips. The trick is to manage the computer displays the files or folders hidden and system attributes its through the folder options. Here are tips to restore a file or folder that had been hidden by the virus, please refer to either:
  1. Open you Windows Explorer
  2. Click Tools menu and then Folder Options
  3. In Folder Options window, uncheck the "Show hidden files and folder". The function this option for display hidden files or folders atribute.
  4. Then, to display file system attributes, remove the check mark (grass) on the option "Hide protected operating system files (Recommende)."
  5. Click OK to save the change and close Folder Options window
Now, check the your files or folders are hidden by virus. Has appeared in windows explorer? If you have, see that files or folders. The files or folders will be visible only faintly. Files and folders will not be shown if you copy it to another computer without doing the settings in folder options. To do this, you need a software. The software that you need is works to change the attributes of a file or folder. One of the software which I think is very good enough is Attribute Changer.

With using Attribute Changer software, you can change the files or folders attribute with one click. You simply right-click a file or folder, then select Change attribute. In the window Attribute Changer choose the appropriate attribute. So you can restore files and folders are hidden by viruses, then the set of attributes to normal and remove the check mark on the hidden and system option.

With Attribute Changer software, to restore files or folders are hidden by the virus is very easy. And the Attribute Changer software can be downloaded for free. Alright, if you want to free download Attribute Changer software, please copy and paste this address in your browser: www.softpedia.com/get/System/File-Management/Attribute-Changer.shtml.

Windows 7 sold 90 million copies in less than 6 months

Windows 7 sold 90 million copies in less than 6 monthsSEATTLE - Only in less than 6 months, Microsoft claims to have successfully sold 90 million copies of Windows 7. Microsoft's latest operating system that went into production in July 2009 and released to the market in October 2009.

Achievement is reported by Peter Klein, Chief Financial Officer of Microsoft, last week, when delivering a presentation at the Morgan Stanley Technology Media and Telecom Conference and San Francisco, USA. Previously, Microsoft had never reported the sale of 60 million copies of Windows 7 in January 2010.

However, the businesses users of Windows 7 are still not satisfactory. As reported by the Telegraph, Klein admitted that it might happen because of the attitude of prudence IT managers to make changes. However, Microsoft believes that Windows 7 adoption among businesses will increase the launch of the service packs that fix some weaknesses and new features. Service packs are planned out this year.

How to Manage Ubuntu Accounts

In managing features, accounts Ubuntu has many similarities with Windows 7. If in Windows 7, manages accounts controlled on the control panel menu. But in Ubuntu there is the menu "System> Administration> User Management> Administrator Mode". Here is a step to manage the account on Ubuntu:

To add a new account, here's how:
1. Click the "New".
2. Change "Login Name" with the desired user name.
3. Click the tab "Passwords and Security".
4. Enter the desired password, then press "OK". New account is created.

To edit your account:
1. Log in to the menu "System> Administration> User Management> Administrator Mode".
2. Choose a user name you wish to modify.
3. Click the "Modify".
4. Replace the information you want changed, and then click "OK"

To delete your account:
1. Click the menu "System> Administration> User Management> Administrator Mode".
2. Select the user will be deleted.
3. Click the "Delete".

How do you think? Which is easier to manage accounts with windows 7? I hope, Ubuntu tips on managing these accounts can be useful.

Sony Ericsson W995, the Walkman Touch Cybershot

There hape minimalist designed to attract people with a modern image. Some people agrees that offer. But others feel more secure in hape SonyEricsson W995 such as this.

Before the slide just opened, the body was immediately taste crowded with all sorts of menu buttons, plugs, sombol, and accents. Like punk kids who filled trinkets on her body alone. But this is okay. The presence of all the trinkets that just made a kind of guarantee that much can be explored in this mobile cell phone.

On the right side, there are music buttons on duty mobile phone to strong image that this is the series W (Walkman) from SonyEricsson. Also in the same row there is also the camera shutter button that the resolution capacity is unsparing: 8 megapixels.

Lucky quiet side of the left side buttons, replaced by a slot outlet charger or data cable and M2 memory slot is covered by the battery casing. Even so, there remained a Walkman shortcut button on this side, as if to show that features the music is very rich and endless.

Buttons the size of a half circle and keypad and button layout makes it instantly caught hape Sony Ericsson really. Just done with the touch of a kickstand gave the alias buffer body back, so this hape be incarnated as a multimedia device, especially for comfort when used for watching movies.

Music
Predicate Walkman is a guarantee of quality for hape music. Still, not all the Walkman series can meet the expectations. Well, this includes the W995 will be very satisfying for the customer's hearing needs.

Congenital speakers for hape class, W995 bringing the best speakers. When playing a good source of music, noise is minimal. Reproduction audiojernih bin nodes. Detailed low tone and (especially) high could be presented with a whole, not broken.

Although a small speaker, but stereo effect comes with a straightforward, do not be shy. Be smart maximize the tone priority to get the appropriate sounds or types of musical tastes by using equalizer with many choices of music genres.

The Walkman's SonyEricsson could be questioned because it did not also want to support the comfort of their music by providing a standard 3.5 mm plug on hape Walkman. But if insyaf, Siemens provides the plug on the W995. Comfortable!
Outside the music player, many features associated with music can be explored. For example there SensMe feature. This fun feature that can classify music based on our mood. Songs rated in the four quadrants tempo and feeling. Want to slow songs and "yellow-mellow", fast but still "yellow-mellow", a slow but happy, or fast and happy? Just choose the variation based on the quadrant and the coordinates, which are presented with an interesting visualization.

There is also MusicDJ, which allows us arranges music easily, stay put music elements into a canal that is available. Then there TrackID feature to get a piece of music over the Internet. Completeness of the musical is also enriched by the presence of FM radio.

Camera
The existence of high-resolution camera, 8 megapixel camera, giving "kick" that cool for the W995 Walkman already had it. Touches on the Walkman Cybershot. That way, users have the devices with capabilities in the field maximum, music and photos. Make drooling not it?

To-quality 8-megapixel camera, the picture is not likely to satisfy embarrassing to capture beautiful moments and monuments. However, to make images that meet the artistic standards, need special treatment, either before or after shooting.

Special treatment before the shooting was an object to the adequacy of conditioning light. With enough light, not excessive and no less, the new images can be performed without the noise.

Special treatment was that the image captured after the shooting appeared to be on the computer or directly on the W995 itself. There are features to smarten PhotoFix photos. There are other features PhotoDJ can also edit the photo in order to better to be able to provide decoration or effect on the image.

Display various controls on the screen capture quite helpful. There are many other features hidden controls to be able to produce images in accordance with the ideal. Features an interesting example is: face detection, geotagging for photos, metering for exposure, image and video stabilizer, BestPic, autirotation, macro mode.

The resulting videotape worthy recommended, either to be stored in the phone maupum transferred to a computer to play there. There is a video stabilizer feature to reduce blur due to movement at the time of recording.

Interface
Glimpse W995 screen interface is dedicated to modern lifestyle. Menu designs and fresh and artistic icons, ditingkah with animation that makes it seem always dynamic. Home screen, aka the main screen, for example, as a hyperactive child would not stop to display an animation with an artistic touch technomodern.

The following animation game striking color to the current menu on the menu monochromatic-shades of non-active menu options, in addition to providing a touch of art, as well as ease of use. The beauty of this interface continues especially in the multimedia menu, so the colors and shades of techno was all. Although, in some menu folder, on the third level menu depth, SonyEricsson returned to its traditional menu that is much we know.

Connectivity
In addition to the camera and musicality, one thing stands out is the W995 other than WiFi. This connection is available in hape and easy to connect. Only unfortunately, this superiority, as well as other connectivity features are not sufficiently enough to be contained even more prominent and easier, for example by creating a special folder for the Connectivity menu. On the W995, the menu is simply dicemplungkan Connectivity in the Settings menu.

Instead GPS and map features a special treatment. Yes, there are GPS that works very well and fast in acquiring satellites in W995. Coordinates of the search results can then be utilized in several applications that are packed on the menu Service Location: Google Maps, Navigation, and Tracker. GPS is also strengthened with Assisted GPS coordinates for the search more fast.

Problem menus and interfaces, according to the signals, they also have not got a touch of "new" growth trend megikuti applications related to social networking and the Internet in general. Boro-boro get chat applications and social networking, aka Web 2.0, the W995 interface menu there are only a group which contains only Internet browser innate Sony Ericsson.

Its own browser perform satisfactorily. Light but powerful, able to compete with Opera Mini browser's classmate, who was victorious in the global browser market.

Our opinion:
Music and narcissistic now be found in one package on many people. So there's no harm in offering two luxury as well as on the W995 hape this. Although the music and camera are both high level, but the musical element in this alloy is still higher quality appearance. Yes, his name is also a series of W.

Plus: excellent quality music; high-resolution camera; design and modern interface, Memosi gede; WiFi

Minus: The grouping of less touch interface features superior; camera still like to noise

Comparison
- Samsung SGH-i8510 INNOV8
Samsung that it relies on the Symbian operating system. Besides relying on 8-megapixel camera, the other treats the multimedia capabilities of a large scale.

- Samsung Ultra Touch S8300
Ultra Touch Samsung S8300 is more forward side than the touch screen camera 8 megapixelnya. Results jepretannya mediocre. Ease to use the camera is not sufficiently provided.

- LG KC910 Renoir
LG KC910 Renoir is concentrated on the capacity of the camera resolution. Since the lens until a special button to activate and snapped the object being looked after and accommodated.

Sony Ericsson W995
Dimensions: 97 x 49 x 15 mm
Weight: 113 gr
Battery: Li-Po 930 mAh
Talk time: 4 hours
Standby time: 360 hours
Music time: 20 hours
Network: GSM 850/900/1800/1900MHz HSDPA
Screen: TFT, 62 million colors, 1 240 x 320 pixels, 2.6 inches
Internal Memory: 118 MB
External memory: Memory Stick Micro (M2), hotswappable
Connectivity: GPRS Class 10 32-48 kbps, EDGE Class 10 236.8 kbps, 3G HSDPA, 7.2 Mbps; 2Mbps HSUPA, Wi-Fi 802.11 b / g, Bluetooth v2.0 with A2DP, USB v2.0, audio jack 3.5 mm
Camera: 8MP 3264x2448 pixels, autofocus, LED flash, 16x digital zoom
Messaging: SMS, MMS, Email, IM
Applications: Walkman media player, TrackID music recognition, Games, VideoDJ, PhotoDJ, MusicDJ, Remote Control, Record Sound, FM Radio, Google Maps, Navigation, Tracker, SensMe, PhotoFix.
Package Contents: SonyEricsson W995 Headset, Handsfree, Charger, Battery, Manual, Warranty Card.
Other: shaker, motion gaming, video blogging, geotagging, face detection for images, Modem, PictBridge, AGPS, Clear Stereo, Clear Bass, a flashlight.

Linux Have Special Kavling in Nokia

Although not interested in using Android, Linux remains a "lot" or a special place in Nokia. The world's largest mobile phone vendor, based in Finland was specifically developed Linux as a platform next to his future Symbian.

"Linux has a different positioning with Symbian. Linux will be used for computing products and Symbian for smartphones. One more platform S series we see growth ahead," said Chris Carr, Vice President Sales Southeast Asia Pacific (SEAP) Motorola, in one series Showcase Nokia 2010 event in Bangkok, Thailand, Tuesday (23/2/2010) evening. One of the computing-based products, the Nokia N900, which is the first handset with Linux Maemo 5, seeks to bring the same experience of using a desktop or notebook computers with mobile devices.

Not long ago, Nokia strengthens seriousness of Linux to strengthen cooperation with Intel. Both agreed to combine the development of Linux-based platform, Intel's Moblin, and the Nokia Maemo be Meego.

Carr asserted, multiplatform strategy is an effort Siemens entered the segment with all the diverse product selection according to user needs. All three platforms now become the basis and the future Nokia will not kill each other. Nokia also ensures Linux and Symbian as an open source platform and will hold sleuruh application developers in the world to participate provide solutions for mobile-phone product.

However, he admitted, with a number of platforms to challenge for Nokia to face the complexity for users and developers. To overcome this problem, Motorola seeks to provide a tool for cross-platform application development can be done more quickly. Carr says, Nokia has been providing solutions in the application layer and development tools that can generate cross-platform applications, among others, called Qt and Web Runtime.

"With the application layer, developers simply create an application with Qt, and it can be lowered to all platforms," explained Carr. Solutions like these that are now spread around the world including Indonesia.

OS Ubuntu combined with the Sony Ericsson Xperia X1

OS Ubuntu combined with the Sony Ericsson Xperia X1OS Ubuntu combined with the Sony Ericsson Xperia X1

OS Ubuntu is one of the most flexible operating system, proven operating system can be combined with a variety of platforms and applications. Ubuntu is one of best application for mobile smartphones like Blackberry, Apple, Motorola and more. Latest news is the OS Ubuntu was able to be combined with one of the leading Sony Ericsson Xperia X1 smartphones. Of course this is very exciting news, especially for Sony Ericsson Xperia X1 users.

Although all of the features have not or can not walk very well but this is the discovery that we can develop later because the Ubuntu operating system is one best of open source operating system. If you are interested to follow information on how to combine the Ubuntu operating system with Sony Ericsson Xperia X1, please visit the tutorial from XDA Developer site XDA Developers or via Engadget.

How to Quickly E-Mail Respond in Outlook 2010

How to Quickly E-Mail Respond in Outlook 2010Whatever action you do to the e-mail you receive? Apart returned, typically electronic mail will be forwarded to a friend or colleague. To do this, surely you must click on Reply or Forward and then type the e-mail address that goal really was-that's all.

There lho quick way to respond to e-mail that went. Here's how.
  1. Click "Start> All Programs> Microsoft Office> Microsoft Outlook 2010".
  2. Select the e-mail to respond, and then consider the block Quick Steps in the tab "Home". There were options to Move, Team E-mail, to Manager, Reply & Delete, and Create New.
  3. Match menu, click To Manager to forward to your Manager, Team E-mail to disseminate the contents of the e-mail to team members, or Reply & Delete to reply to e-mail.
  4. Button "To Manager", "Team E-mail", and "Reply & Delete" will automatically open a new window for typing e-mail response or a window to forward e-mails to the bosses who are ready to be sent to the destination. When you first click on the button "To Manager" or "Team e-mail", you will be prompted to enter an e-mail your Manager.
  5. Staying click "Send" to send e-mail.

Improving Damage Data E-mail

Microsoft Outlook is always connected to the file "Personal Folder File" berekstensi PST. Create who do not know, this file serves to store e-mail and settings folder in Outlook.

By default, when you first start Microsoft Outlook, PST will be created and placed in the C:-Documents and Settings -Local Settings-Application Data-Microsoft-Outlook-in XP or c:-Users--AppData-Microsoft-Outlook-in Vista and 7.

Is definitely not fit anymore, could happen this file corrupted e-mails that could not be opened. If this happens, do not pesismis first. We try Oprek PST file with a hidden tool supplied by Microsoft. This tool is called the Inbox Repair Tool. Where is the location, and how it is used? Follow the steps below.
  1. Start Windows Explorer, then go to the folder C:-Program Files-Common Files-System-Mapi-1033-.
  2. In the 1033 folder, look for programs with scanpst.exe name, and run the program.
  3. After the window "Inbox Repair Tool" is open, enter your file name and its path in the "Enter The Name Of The File You Want To Scan".
  4. To set the log file settings, press the [Options ...].
  5. The next step, click the [Start]. Inbox Repair Tool to quickly repair all your files are corrupted.
  6. When all files have been repaired, click [Close].
  7. Now open the file. Pst you to import it through Microsoft Outlook.
Please note, the number of files that can be "saved" depending on the level of damage that you correct the file. If the damage is severe enough, of course files can be read only a few or even can not read at all.

Print E-mail List

Want to print the e-mail? That's no easy task. Just choose just the e-mail which will be printed, right-click, and select Quick Print. The contents of the e-mail will be directly printed via the printer.

But what if you want to print a list of e-mail? There are practical ways to do it.
  1. Start Microsoft Outlook 2010.
  2. Click the tab "File" at the top left corner of the screen.
  3. Select the "Print" to print.
  4. On the "Print What", select "Table Style".
  5. On the right side preview window will appear containing printouts of e-mail list. Preview also displays all the pages that will be generated.
  6. At the printer, select the printer that will be used for printing.
  7. Click the "Print" which is at the top to start printing.

Read E-mails Like Chatting

Formerly, the usual e-mails appear one by one based on the incoming shipment. As a result, you will need a series of difficulties as related conversations.

In Outlook 2010, these weaknesses have been overcome. This program has adapted the concept similar to the Outlook Mobile in Windows Phone. Related messages can be displayed simultaneously in a group. In this way, e-mail activity was similar to chat. We can see the history of conversations that have been done instantly.

To configure a new conversation model ala Outlook Mobile this, follow these steps.
  1. Start Outlook 2010 via the "Start> All Programs> Microsoft Office> Microsoft Outlook 2010".
  2. Click the tab "View", then consider the Arrangement. There is the "Conversation" with a large triangle below. Click on the button.
  3. Make sure there is a check mark in front of the option "Show Message in Conversation".
  4. Give a check mark in front of "Show Messages in Other Folders". This option will make Outlook display the conversation in the Inbox and Sent Items.
  5. To view all the talk at the same time, provide a check mark in "Always Expand Conversation".
  6. Now, try to click on one of the e-mail responses you receive. Below it will appear a series of conversations via e-mail with the subject and the same topic.

Tips Limiting Hard Disk Capacity

Tips Limiting Hard Disk CapacityThe available hard disk space is where the easy out. Various types of files and folders are likely to continue growing each time, plus the tendency of the file size growing.

In order to save money, you can use quotas feature of Windows. Basically, this feature works to give hard-disk space quota for each user. To use it, the partition must use the NTFS file system. After that, you can right-click the drive you want to set its quota. Then select the tab "Quota". Check "Enable Quota Management" to activate it. Then check also "Deny disk space to users exceeding quota limit".

Click the "Quota Entries" to regulate how much quota for each user. How, from this window, simply click the name of the user who wants to be given quotas. Then adjust the desired large quotas. For example, here is set quota of 100MB for the guest account with 80MB warning level. That is, if the guest user account to use more than 100MB space, then the window will pop up a warning that disk space is not enough anymore.

Another advantage of the quota, the label that shows the amount of hard disk space available will change depending on the user's quota. Back to the example above, if the guest user account is open My Computer, then the amount of disk space on the screen is only 100MB. So, as if his hard disk capacity is only 100MB, though it did not for it.

The use of quotas would be very helpful, especially for PCs that are used together. With the division of quotas, there is no longer expected to fight hard disk space quota, which in turn facilitate the administration of the system.

Automatic Reading Excel Text Data

Automatic Reading Excel Text DataWorking with a spreadsheet is not easy, especially if you are required to maintain the accuracy of the data contained there. Now, with Text to Speech feature, you can make the computer read any text that is inserted into Microsoft Excel to do the verification. Here's how to activate it.
  1. On the "Tools" menu, select "Speech", then click "Show Text to Speech Toolbar".
  2. Select the cell you want to read.
  3. On the toolbar "Text to Speech", click "By Rows" to the computer to read per line, or select 'By Columns' to the computer to read data per column.
  4. Click the "Speak Cells" to the computer to read the cell that you select.
  5. If you find errors in the data, click on "Stop Speaking", and then use the mouse to fix it.
  6. Click the "Speak Cells" to continue.
In order for Excel to read any data you enter into the cell, this trick for trying.
  1. On the "Tools" menu, select "Speech", then click "Show Text to Speech Toolbar".
  2. On the toolbar "Text to Speech", click the "Speak On Enter". Furthermore, every time you enter data in a cell and press Enter, the computer will read the data in these cells.

Use Voice Command In Microsoft Office Programs

Use Voice Command In Microsoft OfficeSame with Windows Media Player program, we can also use a voice command Office or the so-called speech recognition. In addition, you can also dictate or select menus, toolbars, and dialog boxes using voice (in English).


Never use this application? You can do the installation by clicking the "Speech" on the Tools menu in Microsoft Word, or run a Custom installation during installation of Microsoft Office. Once installed, the button will appear in Speech Tools menu in all Microsoft Office programs.

To start using it, you need a microphone connected to the sound card or USB, a computer with a minimum speed of 400MHz or more, at least 128MB RAM or more, and Windows 98 until the latest.

There are two options available modes of this feature, the Voice Command and Dictation. Voice Command mode allows you to give commands in Microsoft Word, for example, to select menus, toolbars, dialog boxes, or to change the format of the document. While to dictate Microsoft Word so you do not need to type them with the keyboard, select Dictation mode. To switch between Voice Command mode and Dictation, just click the button on the Language bar or by saying "voice command" or "dictation" on the microphone.

Examples of speech recognition to change the font via voice:
  1. To open the Font box on the Formatting toolbar, saying: "td".
  2. To change the font of Times New Roman to Verdana, said: "verdana".

The easy way to edit photos with Photoshop

The easy way to edit photos with PhotoshopThe easy way to edit photos with Photoshop

Many good things that affect the very least a photo: from the point of view, the object, to the effect. But the most striking is the quality of color and lighting. If by any chance the photos you take experienced shortfalls in this case, do not have to be disappointed. There are easy ways to outsmart. Take advantage of the software only if digital.

Is Adobe Photoshop - photo retouching software that is popular with graphics and photography actors - who I select. Although the software is classified as a pro class, there are many compact facility that you can use to improve the image quickly and easily, even for ordinary users though. Adobe Photoshop CS4, final version, provides many facilities to meet those needs. Live clack-click of the mouse for a while, your photos will look more beautiful.

Want try? Follow these steps.
  1. The first stage, consider first picture if you want, where faults. Photos appear dim, the color is opaque, much less detail the object? Let's fix it.
  2. The first and easiest is to use the auto adjustment. How, click [Image]> [Auto Tones]. Take advantage also [Auto Contrast] and [Auto Color].
  3. If the result is less satisfactory, let one by one we Oprek each component image. First, the lighting. Click [Image]> [Adjustment]> [Levels]. Wait until the Levels dialog box appears.
  4. If the images look dark, drag the slider bar to the left white so images look bright. Do not forget to move the slider a little gray (midtones) to the right to maintain the image detail. If the images are too bright, move the slide bar to the right black. If so, click [OK].
  5. Another way to maintain the detail and lighting is set by adjusting the contrast. Click [Image]> [Adjustment]> [Brightness / Contrast ...]. In the dialog box that appears, move the slide bar "Brightness" to the right to increase the level of the photo caption, and then followed by "Contrast" to prevent the image detail is lost. If so, click [OK].
  6. Improve the color and lighting can be done simultaneously with Curve facilities. Click [Image]> [Adjustment]> [Curve ...]. In Curve dialog box, available from a number of facilities to improve the image instantly. One is the [Auto] that can be used to improve the quality of lighting automatically.
  7. In this box is also available rapid setting (preset) for a number of output results. For example, if you want the image has the contrast level is rather high, simply click the drop-down menu "Preset", then select [Increase Contrast].
  8. To apply the settings manually set the color curves in the middle of the box. Click one point on the curve line, then drag up or down. For example, in the position [RGB], if the curve is clicked at the bottom left and then pulled down, then the picture will turn dark with high contrast levels. To raise the level of brightness, click on the top right point and drag upward.
  9. You can do this step for each color channel (for RGB, the image consists of channel Red, Green, and Blue). If you want to raise the red element in the photo, click the channel [Red], then click-drag the curve to achieve the desired color. Please imaginination with color photos here. Click [OK] to close the box.
  10. If the color variation in your images look a lot less due to the quality of the camera sensor, color by clicking ragamkan [Image]> [Adjustment]> [Hue & Saturation ...]. In the box that appears, move the "Saturation" to the right to increase the variety and intensity of colors in the image.
  11. If a particular color that you want to raise its intensity, click the menu marked "Master", and select the desired color. Drag the slide bar to the right "Saturation" to the colors you choose are increasingly "hard". When done, click [OK].
  12. The latter, also to regulate the lighting, use [Image]> [Adjustment]> [Exposure ...]. Manage the three existing slide bar to adjust the light-dark photo. Click [OK]. All of the above tools is an effective tool to enhance your photos.

Create an image skull like Ghost Rider

Create an image skull like Ghost RiderCreate an image skull like Ghost RiderThe skull was burning like effects in science fiction movies is the theme this time digital imaging. Although a bit smelly horror, your results are guaranteed is very cool. How to make it not too difficult.

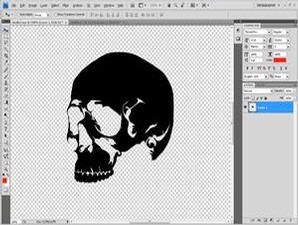
To create a cool effect of the skull on fire, you just need a few tools in Adobe Photoshop CS4. Smudge tool, plus a refined gradient tool and a little movement with the pointer like a painting. In addition, also provide images of the skull that can be made with a vector application such as CorelDRAW or Adobe Illustrator. No need to create a complex picture and details, a simple enough way skulls skull silhouette images presented here. Do not forget, is also drawing fire prepared a black background.
Was ready to start? Let's play.
  1. Prepare a simple skull image as I making here. You can make it with another style, you know. Make a simple drawing, such as the silhouette. Use a black or white color as the base.
  2. Prepare the work area by drawing the desired size. Give the black color in the work area by pressing [Shift] + [F5] on your keyboard. Continue to choose [Black] on the menu "Use". If so, click [OK].
  3. Choose red and black, in the "Foreground color" and "Background color" in the toolbox. Select [Gradient Tool], then [Foreground to Background] and [Radial Gradient] on the menu in the toolbar gradation setting.
  4. Click-drag the pointer from the middle of the document outside the work area to appear red circle gradations. Continue with importing images into the work area of the skull. Give the name of the skull on the drawing layer.
  5. Press [Ctrl], then click on the layer "Skull" to appear around the image selection. Click the gradient tool again with fashion "Foreground to Background, but with yellow and red. Click-drag the pointer in the image of the skull.
  6. Press [Ctrl] + [D] to remove the selection. Enter the image of fire, and named the "Api1". Lower the value of this layer opacity to 80%. Continue by pressing [Ctrl] and click on the layer "Skull" again.
  7. Click the layer "Api1", then press [Shift] + [Ctrl] + [I]. Press the [Delete], so that the image of fire to form a skull image. To look dikobari fire, click [Smudge Tool]. Select the type of brush "Chalk" or "carcoal" in the menu "Brush".
  8. Press [Ctrl] + [D]. Asleep on the image layer "Api1" to form the blaze. Use a brush size variations. To increase or decrease the brush, use slidebar "Master Diameter" in the menu "Brush".
  9. Enter another fire images, and named the layer "Api2". Try drawing a lick or flames. Change the blending mode to [Screen] and position it at the top of the skull. Change the size to fit the skull.
  10. Press [Ctrl] + [T] until the box appears around the second fire. Press [Ctrl], then click-drag one corner of the box to adjust the form of fire with the skull. Continue with the other corner. If so, press [Enter] on the keyboard.
  11. The second fire was fast asleep with the Smudge tool as the previous step for forming the blaze. To form a dark-light illumination of the skull, use the [Dodge Tool] or [Burn Tool], and fell asleep on the necessary parts.
  12. Make sparks with [Brush Tool] type of hard red and small. Create a new layer and named "spark". Pulaskan on the outside of the skull, and then wipe the spark Smudge Tool.
  13. Combine all the layers. Click [Layer]> [Flatten Image]. To reinforce the color of fire, press [Ctrl] + [M]. Use the box "Curve" to confirm color. Use the preset [Linear Contrast] or [Strong Contrast], then click [OK].

The more beautiful with Shadow Effect

The more beautiful with Shadow EffectThe more beautiful with Shadow Effect

Consider carefully a number of product advertising, particularly print advertising electronic products, such as gadgets, mobile phones, and the like. Form of what the product images show up there?

The images are created in such a way that seemed luxurious and beautiful. And the most convenient features is the impression of a reflection effect. Consider it, a number of product photos, though looks simple or without additional ornamentation, yet still keep looking good thanks to the effect of this reflection.

Reflection effects can be created in two ways, namely by generating reflection photographed (using a field that can bring such a good image with acrylic), or digitally if so reflected.

For those of you who do not have adequate equipment to create a reflection effect when taking pictures, if the digital way is worth a try. In fact, you can create this impression with ease using any imaging software. In this tutorial, I use Adobe Photoshop CS4. If you use other software, no need to be discouraged. Stages practice more or less the same, really.

It's ready to try? Let us begin.
  1. Open the image to be formed products reflections. Make sure you take a photo with the background (background) plain. If not innocent, remove the existing background by selecting an object, perform inverse, then fill the background with a plain color.
  2. Make sure your images have the space to form a reflection. If not, dilate the image by clicking on the canvas [Image]> [Canvas Size ...], or press [Alt] + [Ctrl] + [C]. In the Canvas Size box, add the photos to be more wide and long.
  3. For example the canvas size of your image is 8cm x 10cm. To create a reflection, add the length of the image to fill the bottom with a number of around 15-20 cm for the "Height", and select the arrow to the top of the "Anchor" to the canvas extends downward.
  4. Add the broad canvas photos on the "Width" if necessary. For wide, no need to specify an anchor to a proportional increase space on either side of the canvas. Select the color matches the color of the canvas background image on the "Canvas extension color:". Click [OK].
  5. Now the main image by double clicking the layer "Background", then press the [Ctrl] + [A], or click on [Layer]> [Duplicate Layer ...]. Click [OK] on the notification box that appears. Because the condition is always inverted reflection of the position of the main image, you must turn it over.
  6. Click the layer duplication, and then click [Edit]> [transform]> [Flip Vertical]. Duplicate layer will be reversed vertically. Change the layer blending mode via the drop-down menu above the Layer dialog box, it becomes [Multiply]. Shear layer to reflect directly beneath the main object.
  7. Reflection does not bring the main object intact. Generally, there are gradations in the reflection impression. To make it, use the gradient tool facilities. First, create a first mask layer by clicking layer duplication, then click on [Layer]> [Layer Mask]> [Reveal All].
  8. After the mask layer is formed, click [Gradient Tool]. Make sure the color is selected in the two boxes and color-foreground-background color is black and white. Choose mode [Black to Transparant] on the menu "Gradient Editor" on the top, then use the gradient type [Linear].
  9. Click drag the gradient tool from the bottom up until close to the main object image position on the layer mask on the duplicated layer. Look, now the object on the layer duplication appeared as vague. So do not look too sharp, a little lower layer opacity value duplication.
  10. To resemble a reflection-which usually appear not too sharp and-paste a bit vague blur effect. Click the layer duplication, not a layer mask, then click [Filter]> [Blur]> [Gaussian Blur ...]. Opaque few pictures a few points, then click [OK]. Reflection has become.
TIPS: Reflections on the Text
Effect of reflection you can also apply in the text to look more beautiful. The way not much different from the tutorial above. Fun, the text does not need to be picture-in-rasterized process so the gradient (gradient) can be applied.

To be more unique, you can add a reflection effect on the text, such as filter "Ocean Ripple" (reflected in the water bath), or filter "Glass" (reflected in the glass). For the application of filters, text or images should be made dirasterisasi. Way, stay right-click the text layer, then select [Rasterize Type].

3-dimensional effect with photoshop

3-dimensional effect with photoshopAdobe Photoshop can be used not only to manipulate photos or images. In CS4 Extended editions, this application also provides facility to create three-dimensional images (3D). Although simple, the result was quite ciamik and practical use.

Some form of ready-made 3D, starting from the form of boxes, balls, donuts, so you can use canned. Just choose the image, click a few options, 3D images can be instantly created.

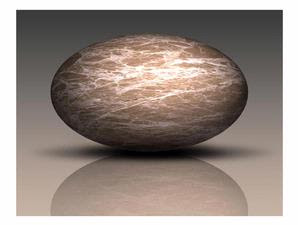
For example, I will invite you make a marble tiles (marble). Changing the texture of ceramic into a ball you can do with little steps.

It's ready to try? Let us start.
  1. Create a new image document. The size and resolution-free. If you later want to print, choose a resolution of 300 pixels / inch. If so, prepare a photo or image texture will be applied to the 3D image.
  2. I obtain this marble texture images from the Internet. With him, PCplus will make a marble from the marble. Enter the drawing by clicking [File]> [Place ...]. Find and select the image that is used, then click [Place].
  3. After the picture comes in, press [Enter]. 3D shape options available in the [3D]> [New Shape From Layer]. Here is some form of 3D that can be used directly, starting form the cube, ball, until the can of soda.
  4. To conjure the image texture of marble into a marble ball, click [3D]> [New Shape From Layer]> [Sphere]. Wait a while until the drawing ball textured 3D images of your choice appears.
  5. Now two 3D tools in the toolbox can be used already. To process the image, use the tool in the ranks of "3D Rotate Tool". This feature consists of five tools, the 3D Rotate Tool (serves to rotate the 3D shape in all directions), 3D Roll Tool (rotate 3D shapes in a single direction), 3D Pan Tool (change or shift the position of 3D), 3D Slide Tool ( change the position and size of 3D shapes), and 3D Scale Tool (change the size of the 3D shape).
  6. In order to appear more realistic, set lighting 3D shapes you create. Take advantage of 3D panel to manage the image. To bring it up, click [Window]> [3D]. To add light effects, click the tab [Filter: By Lights] with bulb icon.
  7. There are three types of lighting provided, namely Point, Spot, and Infinite. Usually, the lighting by default is Infinite. Now, to create new lighting, click the button on the sheet berikon panel "3D", then select the type of lighting needed.
  8. A new light layer will appear. Click the new layer, and set the intensity of the lighting via the "Intensity". You can set the fall of light using an existing tool in the Properties panel layers of light.
TIPS: The more realistic more good
Arange reflection can bounce back to working on more realistic appearance. Change the 3D layer into the image by right-clicking the layer in the panel "Layers", then select [Rasterize]. Duplicate the layer containing the 3D images by clicking on the layer "Background", then press the [Ctrl] + [J]. Click [OK] in the notification box that appears.

Because the condition is always inverted reflection of the position of the main image, you must rotate. Click the layer duplication, and then click [Edit]> [transform]> [Flip Vertical]. If the image requested to be changed into "Smart Layer", just click [Yes]. Duplicate layer will be reversed vertically. Change the layer blending mode-through via the drop-down menu on the Layer dialog box, the [Multiply]. Shear layer until the reflections are just below the main object.

Reflection will not bring the main object intact. Generally, there are gradations in the reflection impression. To make it, use the gradient tool facilities. First, create a first mask layer by clicking layer duplication, then click on [Layer]> [Layer Mask]> [Reveal All].

Once formed layer mask, click [Gradient Tool]. Make sure the color is selected in the two boxes and color-foreground-background color is black and white. Choose mode [Black to Transparant] on the menu "Gradient Editor" on the top, then use the gradient type [Linear].

Click drag the gradient tool from the bottom up on the layer mask on the duplicated layer to a position near the main object image. Look, now the object on the layer duplication seemed vague. So not too sharp, a little lower layer opacity value duplication.

Make a shadow fell below marbles using [Elliptical Marquee Tool]. Make an oval in a new layer below the layer marbles, black color, then give the filter [filter]> [Blur]> [Motion Blur]. Select the "Angle" 0 degrees, then the value of "Distance" maximum. Click [OK]. See the results.

Free Download File Recovery

How to restore deleted filesBefore you delete a file, usually the program first asks whether to delete certain. But some time later we had been wrong because the file is deleted and we need useful. If we do not know how may be confused and difficult to find files that have been erased, but now it has a lot of software or programs that can restore deleted files.

The accuracy of this file returns is between 80-100%, so quite good and effective. Thus we need not fear anymore if one remove. This program is 100% free and no trial program instead. I've used this program since last year and proved good enough to restore deleted data.

Almost every month I use, because my computer is a lot of important files and are often accidentally deleted. Well, for directly download programs that can restore deleted files, please click here.

How to print a protected PDF files

Immediately, the topic of the problem is how to print a PDF file of the protection, we can use the software GSView from Ghostgum. GSView is a free software to outsmart the pdf files in the protection, to get it can be downloaded through http://pages.cs.wisc.edu/%7Eghost/gsview/

How to open a PDF file protection that it can not copy-paste:
GSView has other functions that also can convert PDF files that previously had been protected (can not be printed and on-copy-paste) and into a PDF file that is no longer protected. The way it is, we open the first PDF file with GSView, then select the File menu, Convert, and then we select Device "pdfwrite" to generate a new PDF file which of course is not protected.

in order to run software GSView we also need to install Ghostscript program (also freeware:)), can be downloaded http://pages.cs.wisc.edu/%7Eghost/doc/GPL/index.htm